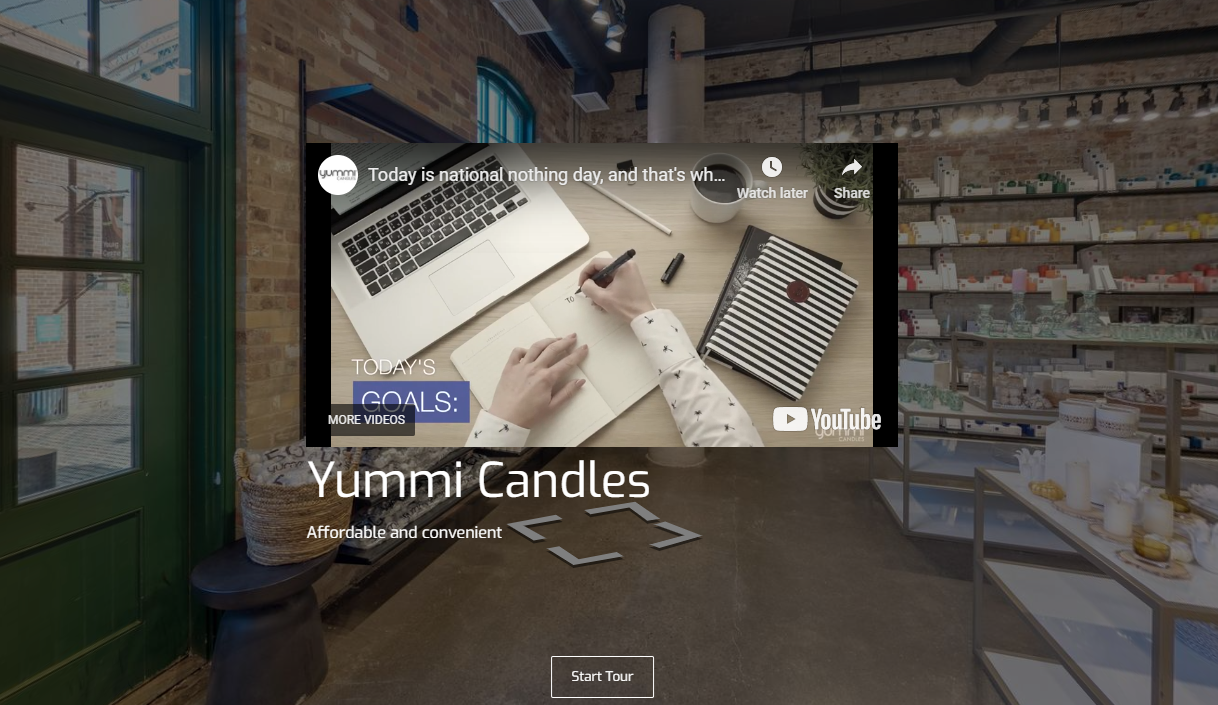
A splash screen is an Overlay additional graphical element consisting of a window containing an image, a video, and a title or brief explanation. A splash screen appears while a panorama is launching and covers the entire overlay screen before you click on it. With a splash screen, you can put an introduction page of the virtual tour or an additional form of advertising for your business.
How to set up a splash screen?
Following are the steps to add a splash screen to your overlay:
1. Click on the “+” icon (A key) to open the Plugin Manager for Hotspots, Menus, Maps, Control Center, and Other. Select Splash Screen under the Other plugin option.
2. The Splash screen menu appears on the right side of your overlay screen and you can make the desired changes using the splash screen settings. For information on what the splash screen settings do, see “Details of splash screen tools” below.
3. Add a background image or video to the splash screen. Click on Image to upload a new image, or select one that’s already in your Asset Manager. To add a video, you can copy the video URL from YouTube or Vimeo and paste it to the background video then refresh (Enter key) to play the video.
4. Add more visuals to the splash screen using the splash screen media that will be displayed at the center of the Overlay. You can select the media type for the splash screen, an image or a video. In the following example, media image and video have been customized.
5. Set the position of the media to the top, bottom, left, or right and resize it using the media size slider. You can also adjust the width and height of the splash screen media using the width and height slider above the media image tool.
6. Include a title and brief explanation to the splash screen media. You can also add an an exit button from the Splash screen to start the tour. In the following example, you see “Yummi Candles” and a “Start Tour” button have been added to the splash screen media.

7. Change the splash screen media colors so it can fit the background. Common colors set the splash screen colors connect to the colors in the general setting. Background color sets the color of the splash screen media background. Active color changes the colors of the active button on the splash screen. Text color sets the colors of the text in the splash screen. Set this color as common sets the color which belongs to the splash screen plugin and determines the default colors choices for other plugins.
8. Now you have a fancy splash screen covering your overlay. Once you are happy with the setups, just click “save” and “publish” to see the results.

Details of Splash Screen Tools
The Following are the details of the tools under Splash screen settings.
Background image: adds an image for the splash screen background.
Background video: adds a video for the splash screen background.
Background color: sets the color of the splash screen background.
Width: adjusts the width of the splash screen media.
Height: adjusts the height of the splash screen media.
Image: adds an image to the splash screen media.
Video: adds a video to the splash screen media.
Media area: controls the position parameter.
Media size: controls the media size.
Title: gives a title to the splash screen.
Text: brief explanation appended to the splash screen.
Button: adds an exit button from the Splash screen to start the tour.
Common colors: sets splash screen colors connect to the colors which in the general setting.
Background color: sets the color of the splash screen media background.
Active color: changes the colors of the active button on the splash screen.
Text color: sets the colors of the splash screen text
Set this color as common: sets the color which belongs to the splash screen plugin and determines the default colors choices for other plugins.


